Candle Making is a soulful craft that combines creativity, awareness, and functionality into one lovely experience; it’s more than just a do-it-yourself pastime. Handmade candles have been increasingly popular in recent years, not just as home décor but also as representations of sustainability, self-care, and individuality. Learning to make candles brings you a world of possibilities, whether your preference is for beautiful soy wax creations, eco-friendly homemade presents, or calming aromatherapy candles.
Essential Tools and Materials:
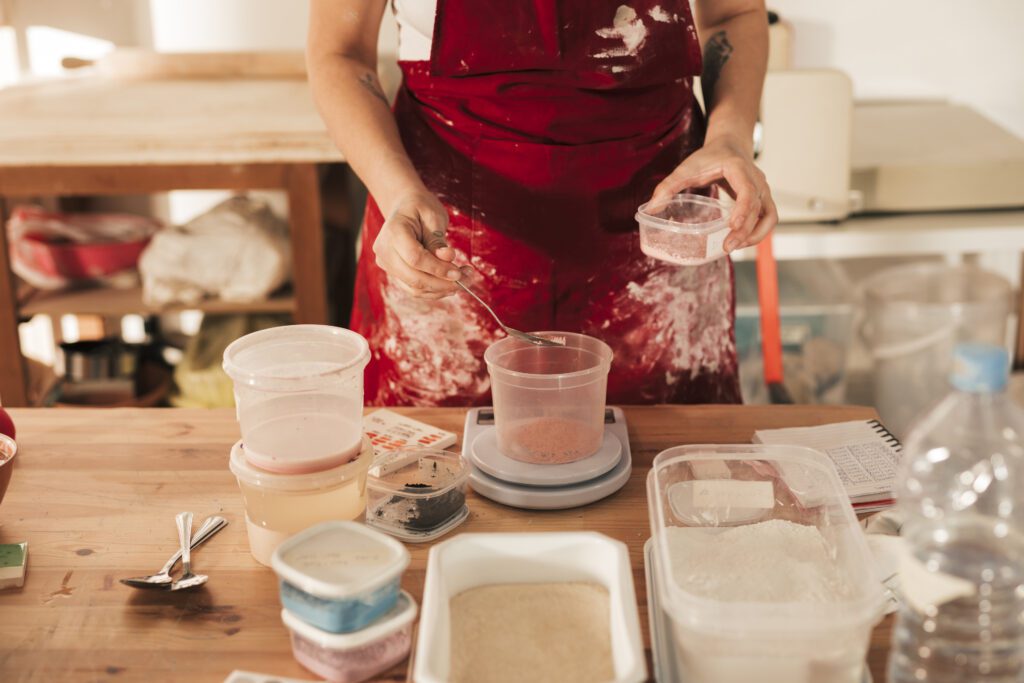
- Wax (beeswax, soy, or paraffin): The foundation of all candles, selected for sustainability, smell throw, and burn quality.
- Candle wicks (wooden or cotton): Make sure the wicks are the same size as the container to ensure a clean, uniform burn.
- Wax can be safely melted without direct heat using a double boiler or melting pot, reducing the risk of scorching or fire.
- Thermometer: Assists in keeping the wax at the proper temperature for pouring and adding scent.
- Essential oils, often known as fragrance oils, add mood and scent; proportion them carefully for a persistent perfume.
- Color blocks or candle dyes are used to add visual appeal and personalize candle colors.
- Before you get started, let’s take a quick look at the materials you’ll need to make candles at home
- Wick Holders or Centering Tools: For a balanced burn, keep wicks straight while the wax hardens.
- For reliable results, use measuring cups or a digital scale to make sure the wax and scent ratios are correct.
- Using wooden or silicone stirring utensils, blend color, aroma, and wax smoothly without creating air bubbles.
- Protective gear (aprons, gloves): Prevents hot wax spills on hands and surfaces.
Following Are The Steps Of Candle Making:
Step 1: Prepare Your Work Area
The first step in candle making is to get everything ready. Find a clean, flat surface to work on, and lay down some newspaper or paper towels to catch any drips. Make sure you have all your materials nearby, so you’re not scrambling later.
Step 2: Melt your wax
Measure your soy wax flakes and add them to your double boiler. What’s the right amount of wax? Double the volume of your vessel is a good rule of thumb since the flakes will melt down. So simply use your vessel as your measuring cup and fill it twice. Place your candy thermometer in the wax and turn the heat to high. Once the temperature reaches 185 degrees Fahrenheit, it’s time to add your fragrance.
Step 3: Add Fragrance and Color
Now, it’s the time of melting wax. If you use a double boiler, place water in the lower pot, pour your wax in the top, and bring that water over a medium fire while letting that wax melt gradually. Stir occasionally with your spoon so that this procedure goes better and faster. However, if you don’t have a double boiler, you can do that by putting your heat-resistant bowl over another boiling pot full of water.
Keep an eye on the temperature of the wax as it melts. You’ll want it to reach about 170°F (77°C) before moving on to the next step.
Step 4: Attach the Wick to the Container
As your wax is cooling down a little bit to around 130° F or 54° C, it is time to prepare your container. Fix the wick at the bottom of the container using a small amount of melted wax or a wick sticker. Be sure that the wick centers the bottom; this will help your candle burn evenly later.
Step 5: Pour the wax
Carefully pour the wax into your container after it has reached the proper temperature. As you pour, keep the candle firmly in position to prevent excessive movement. Give the container’s top a gap of roughly 0.5 inches. To prevent air bubbles, pour steadily and slowly.
Step 6: Let the Candle Cool
Pour the wax over this, and allow the candle to cool thoroughly. This can take anywhere from a few hours to overnight. As the wax hardens, you may find a very small dip where the wick came through. Simply reheat some wax and fill in the little gap to create a smooth finish.
Step 7: Trim the Wick
Once the candle is completely cooled and set, trim the wick to about 1/4 inch above the surface of the candle. This will ensure a clean burn when you light it.
Step 8: Enjoy Your Candles
Congratulations! You have created your very own candle. Now, you can enjoy the warm and beautiful glow, or give it to someone as a thoughtful handmade gift. You may also try new colors, scents, and shapes as you gain confidence in the craft.
Tips for Perfect Candles:
- Use the right wax: Soy wax is great for beginners because it’s easy to work with burns cleanly and holds fragrance well.
- Don’t overheat the wax:You can make use of any materials like glass jars teacups or old candle tins. Make sure however that it is not affected by heat.
- Get creative: To create genuinely one of a kind candles feel free to experiment with various hues fragrances and forms as you practice.
The Emotional Power Of Handmade Candles:
Candles have a special power to affect atmosphere and feelings. A candle that glows softly can change a space, bringing warmth during quiet times or serenity after a long day. Depending on the scent used, aromatherapy candles can improve energy, attention, or relaxation. Handmade candles provide a layer of emotion since they are a reflection of intention, time, and care. A stronger connection to the area and the moment is fostered when you light a candle that you produced yourself.
Turning Candle Making Into A Small Business:
Making candles turns become a lucrative side business for many people. Candles handcrafted by hand are highly sought after for home décor, gatherings, and gifts. Developing a candle brand entails producing distinctive fragrances, reliable quality, and eye catching packaging. Makers can reach consumers who appreciate handcrafted goods by selling on social media, online, or at local markets. Making candles can be a rewarding hobby and a steady source of revenue with imagination and commitment.
Summary:
Making candles is a lovely way to combine creativity, science, and self-expression. Every stage, from choosing wax and wicks to creating signature fragrances, provides opportunity for development and experimentation. Making candles encourages patience and creativity, whether you’re doing it for business, relaxation, décor, or giving. As you proceed with your candle-making adventure, keep in mind that warmth, intention, and connection are more important than perfection. One candle at a time, let your imagination shine.
FAQs:
What is the best wax for beginners?
Because it is easy to work with, burns cleanly, retains smell well, and is environmentally friendly, soy wax is perfect for novices.
How much fragrance oil should I add to candles?
By weight, the majority of waxes can retain 6–10% fragrance oil. Always adhere to the ratio suggested by the wax manufacturer to prevent burns or odors.
Why is my candle tunneling?
An undersized wick or failing to let the candle burn long enough during the initial use are the two main causes of candle tunneling.
Can I use essential oils instead of fragrance oils?
Yes, although essential oils may not work as well as fragrance oils designed for candlemaking and have a milder scent.
How long should candles cure before use?
For the best smell throw, soy candles should cure for seven to fourteen days, but paraffin candles typically require two to three days.
Read More Articles https://trendythreads.net/top-shabby-chic-decorating-ideas-for-every-room-in-2026/